Windows Active Directory - Enumeration
1. Introduction#
- Once we have that first set of AD credentials and the means to authenticate with them on the network, a whole new world of possibilities opens up! We can start enumerating various details about the AD setup and structure with authenticated access, even super low-privileged access.
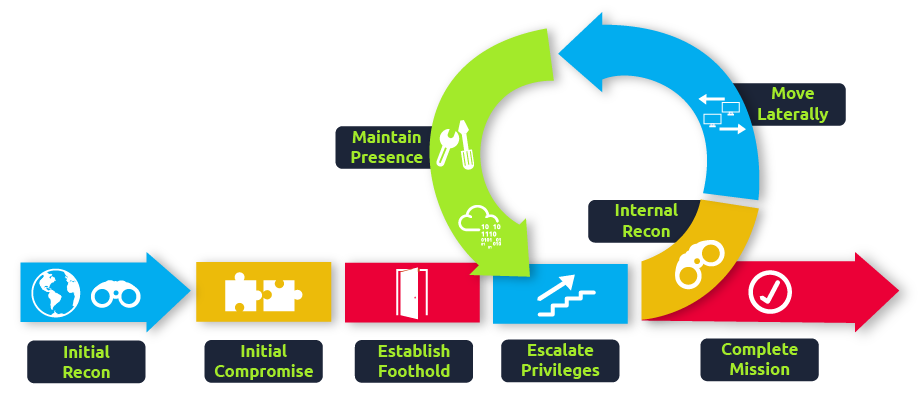
- During a red team engagement, this will usually lead to us being able to perform some form of privilege escalation or lateral movement to gain additional access until we have sufficient privileges to execute and reach our goals. In most cases, enumeration and exploitation are heavily entwined. Once an attack path shown by the enumeration phase has been exploited, enumeration is again performed from this new privileged position, as shown in the diagram below.
2. Credential Injection#
2.1 Runas Explained#
- In security assessments, you will often have network access and have just discovered AD credentials but have no means or privileges to create a new domain-joined machine. So we need the ability to use those credentials on a Windows machine we control.
- If we have the AD credentials in the format of
: , we can use Runas, a legitimate Windows binary, to inject the credentials into memory. The usual Runas command would look something like this: runas.exe /netonly /user:<domain>\<username> cmd.exe - Let’s look at the parameters:
/netonly- Since we are not domain-joined, we want to load the credentials for network authentication but not authenticate against a domain controller. So commands executed locally on the computer will run in the context of your standard Windows account, but any network connections will occur using the account specified here./user- Here, we provide the details of the domain and the username. It is always a safe bet to use the Fully Qualified Domain Name (FQDN) instead of just the NetBIOS name of the domain since this will help with resolution.cmd.exe- This is the program we want to execute once the credentials are injected. This can be changed to anything, but the safest bet is cmd.exe since you can then use that to launch whatever you want, with the credentials injected.
Once you run this command, you will be prompted to supply a password. Note that since we added the /netonly parameter, the credentials will not be verified directly by a domain controller so that it will accept any password. We still need to confirm that the network credentials are loaded successfully and correctly.
2.2 It’s Always DNS#
SYSVOL is a folder that exists on all domain controllers. It is a shared folder storing the Group Policy Objects (GPOs) and information along with any other domain related scripts. It is an essential component for Active Directory since it delivers these GPOs to all computers on the domain. Domain-joined computers can then read these GPOs and apply the applicable ones, making domain-wide configuration changes from a central location.
Before we can list SYSVOL, we need to configure our DNS. Sometimes you are lucky, and internal DNS will be configured for you automatically through DHCP or the VPN connection, but not always. It is good to understand how to do it manually. Your safest bet for a DNS server is usually a domain controller. Using the IP of the domain controller, we can execute the following commands in a PowerShell window:
$dnsip = "<DC IP>"
$index = Get-NetAdapter -Name 'Ethernet' | Select-Object -ExpandProperty 'ifIndex'
Set-DnsClientServerAddress -InterfaceIndex $index -ServerAddresses $dnsip
We can verify that DNS is working by running the following:
nslookup za.tryhackme.comWhich should now resolve to the DC IP since this is where the FQDN is being hosted.
dir \\za.tryhackme.com\SYSVOL\
#Volume in drive \\za.tryhackme.com\SYSVOL is Windows
#Volume Serial Number is 1634-22A9
2.3 IP vs Hostnames#
- Question: Is there a difference between dir \za.tryhackme.com\SYSVOL and dir \
\SYSVOL and why the big fuss about DNS? - Answer: There is quite a difference, and it boils down to the authentication method being used. When we provide the hostname, network authentication will attempt first to perform Kerberos authentication. Since Kerberos authentication uses hostnames embedded in the tickets, if we provide the IP instead, we can force the authentication type to be NTLM. While on the surface, this does not matter to us right now, it is good to understand these slight differences since they can allow you to remain more stealthy during a Red team assessment. In some instances, organisations will be monitoring for OverPass- and Pass-The-Hash Attacks. Forcing NTLM authentication is a good trick to have in the book to avoid detection in these cases.
3. Enumerating Through Microsoft Management Console (MMC)#
3.1 Microsoft Management Console#
We will be using the Microsoft Management Console (MMC) with the Remote Server Administration Tools’ (RSAT) AD Snap-Ins. You can perform the following steps to install the Snap-Ins:
- Press Start
- Search “Apps & Features” and press enter
- Click Manage Optional Features
- Click Add a feature
- Search for “RSAT”
- Select “RSAT: Active Directory Domain Services and Lightweight Directory Tools” and click Install
You can start MMC by using the Windows Start button, searching “run”, and typing in “mmc”. If we just run MMC normally, it would not work as our computer is not domain-joined, and our local account cannot be used to authenticate to the domain.
This is where the Runas window from the previous task comes into play. In that window, we can start MMC, which will ensure that all MMC network connections will use our injected AD credentials.
In MMC, we can now attach the AD RSAT Snap-In:
- Click File -> Add/Remove Snap-in
- Select and Add all three Active Directory Snap-ins
- Click through any errors and warnings
- Right-click on Active Directory Domains and Trusts and select Change Forest
- Enter za.tryhackme.com as the Root domain and Click OK
- Right-click on Active Directory Sites and Services and select Change Forest
- Enter za.tryhackme.com as the Root domain and Click OK
- Right-click on Active Directory Users and Computers and select Change Domain
- Enter za.tryhackme.com as the Domain and Click OK
- Right-click on Active Directory Users and Computers in the left-hand pane
- Click on View -> Advanced Features
If everything up to this point worked correctly, your MMC should now be pointed to, and authenticated against, the target Domain.
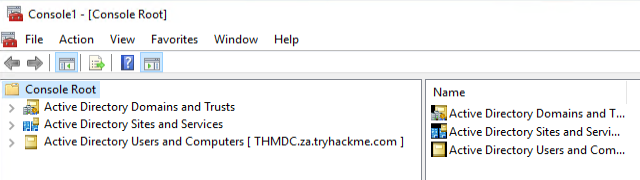
Once done, you can explore the AD structure and enumerate users, groups, and other objects.
If we had the relevant permissions, we could also use MMC to directly make changes to AD, such as changing the user’s password or adding an account to a specific group.
4. Enumerating Through Command Prompt#
- There are times when you just need to perform a quick and dirty AD lookup, and Command Prompt has your back. Good ol’ reliable CMD is handy when you perhaps don’t have RDP access to a system, defenders are monitoring for PowerShell use, and you need to perform your AD Enumeration through a Remote Access Trojan (RAT). It can even be helpful to embed a couple of simple AD enumeration commands in your phishing payload to help you gain the vital information that can help you stage the final attack.
- CMD has a built-in command that we can use to enumerate information about AD, namely net. The net command is a handy tool to enumerate information about the local system and AD.
4.1 Users#
# List all users in the domain
net user /domain

# We can also enumerate more detailed information about a single user account:
net user zoe.marshall /domain
4.2 Groups#
# Enumerate the groups of the domain by using the group sub-option:
net group /domain

# We can also enumerate more detailed information about a specific group:
net group "Domain Admins" /domain
4.3 Password Policy#
# Enumerate the password policy of the domain by using the domain sub-option:
net accounts /domain
5. Enumerating Through PowerShell#
Microsoft first released PowerShell in 2006. While PowerShell has all the standard functionality Command Prompt provides, it also provides access to cmdlets (pronounced command-lets), which are .NET classes to perform specific functions. While we can write our own cmdlets, like the creators of PowerView did, we can already get very far using the built-in ones.
Since we installed the AD-RSAT tooling before, it automatically installed the associated cmdlets for us. There are 50+ cmdlets installed.
5.1 Users#
# List all users in the domain
# -Identity: Specifies the user to retrieve
# -Server: Specifies the domain controller to query
# -Properties: Specifies the properties to retrieve
Get-ADUser -Identity gordon.stevens -Server za.tryhackme.com -Properties *

# we can also use the -Filter parameter that allows more control over enumeration
Get-ADUser -Filter 'Name -like "*stevens"' -Server za.tryhackme.com | Format-Table Name,SamAccountName -A
5.2 Groups#
# List all groups in the domain
Get-ADGroup -Identity Administrators -Server za.tryhackme.com

# enumerate group membership using the Get-ADGroupMember cmdlet:
Get-ADGroupMember -Identity Administrators -Server za.tryhackme.com
5.3 AD Objects#
- A more generic search for any AD objects can be performed using the Get-ADObject cmdlet.
- For example, if we are looking for all AD objects that were changed after a specific date:
$ChangeDate = New-Object DateTime(2022, 02, 28, 12, 00, 00)
Get-ADObject -Filter 'whenChanged -gt $ChangeDate' -includeDeletedObjects -Server za.tryhackme.com

# enumerate accounts that have a badPwdCount that is greater than 0, to avoid these accounts in our attack:
Get-ADObject -Filter 'badPwdCount -gt 0' -Server za.tryhackme.com


# Get-ADObject -Filter 'badPwdCount -gt 0' -Server za.tryhackme.com
Get-ADObject -Filter 'badPwdCount -gt 0' -Server za.tryhackme.com

# Reset password for gordon.stevens
Set-ADAccountPassword -Identity gordon.stevens -Server za.tryhackme.com -OldPassword (ConvertTo-SecureString -AsPlaintext "old" -force) -NewPassword (ConvertTo-SecureString -AsPlainText "new" -Force)